![]() Cameras require a USB 2.0 specification
computer connection.
Cameras require a USB 2.0 specification
computer connection.
Connect the Camera to the computer and install the drivers supplied by the camera manufacturer.
In the program select:
from the Tools main menu -> Settings -> Digital Camera: Moticam MC2001 MC1001 USB-2 ;
from the Tools main menu -> Settings ->Menu: Digital Camera;
restart the program;
from the Digital Camera main menu select Camera Setup.
All the measurement functions that can be used on acquired images can also be used on live images at any resolution or selected format. The system will keep a correct calibration.
Format: allows you to select
the format of the live and capture images. The available values will be
listed after the first restart of the program. The format can be changed
even if the live image is open. If the Best
Fit check box is selected the whole image will be displayed using
the available space. The magnification factor will be automatically selected.
![]() To perform the system's calibration, the 800x600 format is
required for MC2000 and the 640x480 format for MC1000.
To perform the system's calibration, the 800x600 format is
required for MC2000 and the 640x480 format for MC1000.
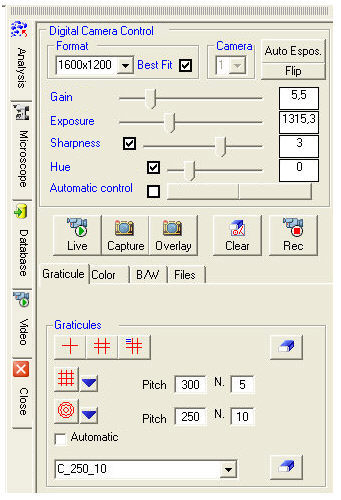 Camera: The software
allows you to use several Moticam digital cameras. The cameras are identified
by a progressive number from 1 to n. The camera can be selected before
activating the live image.
Camera: The software
allows you to use several Moticam digital cameras. The cameras are identified
by a progressive number from 1 to n. The camera can be selected before
activating the live image.
The camera has the following controls: Gain, Exposure, Sharpness, Hue and Automatic Control.
White Balance, Auto Exposure and Flip for image orientation are also available.
The ![]() button enables/disables
the live image. All the measurement functions that can be used on acquired
images can also be used on live images at any resolution or selected format.
The system will keep a correct calibration.
button enables/disables
the live image. All the measurement functions that can be used on acquired
images can also be used on live images at any resolution or selected format.
The system will keep a correct calibration.
The image capture is started by the ![]() button. The
captured image will be opened in the environment and subsequently saved
in automatic according to the settings in the Files
folder.
button. The
captured image will be opened in the environment and subsequently saved
in automatic according to the settings in the Files
folder.
![]() Any measurements on the live image are fixed to the acquired
image.
Any measurements on the live image are fixed to the acquired
image.
The ![]() button executes the image capture without
fixing the measurements to the image. Measurements remain superimposed
on the image (Overlay) vectorially. This allows you to modify the measurements
on the acquired image and to resize the image maintaining a perfect display
of the measurements.
button executes the image capture without
fixing the measurements to the image. Measurements remain superimposed
on the image (Overlay) vectorially. This allows you to modify the measurements
on the acquired image and to resize the image maintaining a perfect display
of the measurements.
The measurements on the live image can also be deleted with the ![]() button as well as from the shortcut menu, which can be activated
on the image with the right mouse button.
button as well as from the shortcut menu, which can be activated
on the image with the right mouse button.
The ![]() button is active on the live image, recording in
AVI format according to the settings in the Files
folder.
button is active on the live image, recording in
AVI format according to the settings in the Files
folder.
The control dialog contains four folders: Graticules, Color, B/W and Files.
The ![]() switch activates the crosshair graticule. When pressed,
the graticule is moved on the image by moving the mouse while in the released
position the graticule is locked and takes on the stroke color.
switch activates the crosshair graticule. When pressed,
the graticule is moved on the image by moving the mouse while in the released
position the graticule is locked and takes on the stroke color.
The ![]() switch activates a double crosshair graticule. When
pressed, the graticule moves on the image by moving the mouse. The left
mouse button swaps the active graticule, whereas the right mouse button
locks them temporarily. In this position the graticules can be moved with
the arrow keys: by holding the <Shift> key down, the arrow keys
move the other graticule. By releasing the
switch activates a double crosshair graticule. When
pressed, the graticule moves on the image by moving the mouse. The left
mouse button swaps the active graticule, whereas the right mouse button
locks them temporarily. In this position the graticules can be moved with
the arrow keys: by holding the <Shift> key down, the arrow keys
move the other graticule. By releasing the ![]() switch the graticules
are locked and take on the stroke color.
switch the graticules
are locked and take on the stroke color.
The ![]() switch is similar to the previous one but displays
the distance between the two pairs of lines. If the Vickers
Measure is active, the test values are also displayed.
switch is similar to the previous one but displays
the distance between the two pairs of lines. If the Vickers
Measure is active, the test values are also displayed.
The ![]() button deletes the graticules.
button deletes the graticules.
Graphic Editor
Allows you to create squared grid
or circular crowns graticules
specifying the pitch and the number of squares or crowns.
If the image is calibrated, by pressing the ![]() or
or
![]() button, the graticule will be applied to the image.
button, the graticule will be applied to the image.
If the Automatic Number
check box is selected, the whole image will be overlaid with the chosen
type of graticule.
The ![]() buttons
insert the graticules created in the Preferences
pull-down list.
buttons
insert the graticules created in the Preferences
pull-down list.
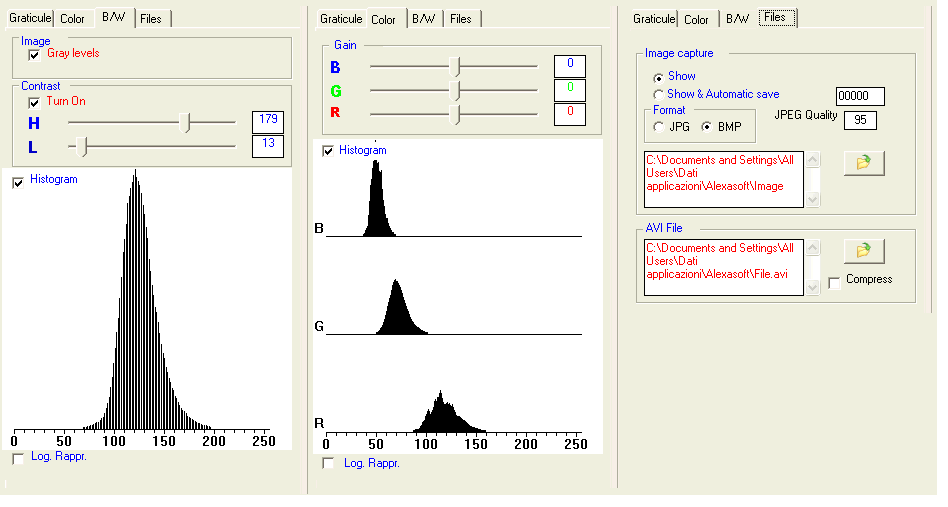
There are three sliders for the gain control of the three color components. It is possible to view the histogram of the RGB (color)components of the live image. The logarithmic representation allows you to view the low frequency samples.
The live image can be converted to black and white in real time by activating
the Gray Levels.
The contrast of the color or B/W live image can be controlled with H. Contrast and L.
Contrast if the Turn On
check box is selected.
It is possible to view the B/W histogram of the live image. The logarithmic
representation allows you to view the low frequency samples.
It is possible to select the image format, the compression and the AVI
file folder.
Images can also be saved in automatic mode specifying the file path and
the starting value of the counter, for example, c:\image00001.jpg.
If a database is open, the saved images are automatically related to the
current record.