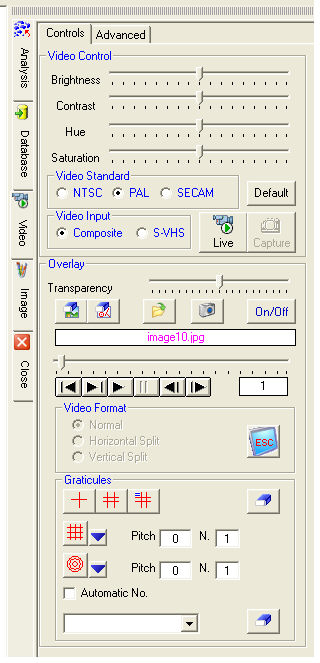
As well as the traditional image controls, you can use the Live buttons to enable and disable the live image and Capture to acquire an image.
From this window you can activate and control the live image overlay.
The![]() button allows you to load an image. This image is
superimposed on the live image as a transparent layer. The On/Off
switch activates the level of transparency through the cursor.
button allows you to load an image. This image is
superimposed on the live image as a transparent layer. The On/Off
switch activates the level of transparency through the cursor.
The![]() button captures an image which can be overlaid on top
of the live image.
button captures an image which can be overlaid on top
of the live image.
The ![]() buttons delete respectively the loaded
image and the graphic part of the live image such as the measurements or the
text.
buttons delete respectively the loaded
image and the graphic part of the live image such as the measurements or the
text.
The ![]() text box displays the name of the loaded image.
text box displays the name of the loaded image.
The multimedia ![]() buttons are activated from the moment an image is loaded
by pressing the
buttons are activated from the moment an image is loaded
by pressing the ![]() button. The Play
button activates the overlay reproduction
mode between the images in the folder and the live image. The interval
in seconds is specified at the side.
button. The Play
button activates the overlay reproduction
mode between the images in the folder and the live image. The interval
in seconds is specified at the side.
Normal: the loaded image occupies the whole video window (default);
Horizontal Split: the loaded image occupies the whole video window but only its lower half is visible and as an overlay;
Vertical Split: the loaded image occupies the whole video window but only its right-hand half is visible and as an overlay;
![]() These modes can be useful to
make visual comparisons both between static images and between sequences
of images through the reproduction
mode.
These modes can be useful to
make visual comparisons both between static images and between sequences
of images through the reproduction
mode.
Full Screen Mode
The ![]() button provides full screen viewing. The transparency
of the images can be controlled with the mouse wheel. If a function of
measurement is active, it will remain so.
button provides full screen viewing. The transparency
of the images can be controlled with the mouse wheel. If a function of
measurement is active, it will remain so.
![]() To restore normal video mode press the <Esc> key.
To restore normal video mode press the <Esc> key.
Graphic Editor
Allows you to create squared grid
or circular crowns graticules
specifying the pitch and the number of squares or crowns.
If the image is calibrated, by pressing the ![]() or
or
![]() button, the graticule will be applied to the image.
button, the graticule will be applied to the image.
If the Automatic Number
check box is selected, the whole image will be overlaid with the chosen
type of graticule.
The ![]() buttons
insert the graticules created in the Preferences
pull-down list.
buttons
insert the graticules created in the Preferences
pull-down list.

All the WDM (Windows Driver Model) devices in the system are displayed
in this list. The device can be activated by selecting it with the mouse.
Several devices and videocameras can therefore exist.
![]() The program does not support more than one device with the
same name as the driver.
The program does not support more than one device with the
same name as the driver.
The Pin selection is automatic for known drivers.
![]() If the device is not in the system's database, the Pin must
be specified manually. The Property buttons can provide the necessary
information. If the Pin is modified, press Save to confirm.
If the device is not in the system's database, the Pin must
be specified manually. The Property buttons can provide the necessary
information. If the Pin is modified, press Save to confirm.
The Pin selection is automatic
for known drivers.
![]() If the device is not in the system's database, the Pin must
be specified manually. The Property buttons can provide the necessary
information. If the Pin is modified, press Save to confirm.
If the device is not in the system's database, the Pin must
be specified manually. The Property buttons can provide the necessary
information. If the Pin is modified, press Save to confirm.
The controls in the window allow you to eliminate the possible vignetting of the live image (black frame) and to adjust the scale factor to correct the image coming from a non-square pixel camera.
Once the horizontal calibration has been performed, rotate the reference scale through 90° and acquire a new image.
From the Measure menu or with the X-Vick measuring graticules, measure vertically the same distance on the reference scale. If the image was acquired with a square pixel device the vertical length will be the same as the horizontal one. If instead the two lengths differ by an unacceptable degree, you will need to recalculate the new scale factor (F).
F = (horizontal length) divided by (vertical length);
If F is greater than 1 then BOTTOM = BOTTOM divided by F;
If F is less than 1 then RIGHT = RIGHT multiplied by F;
Let us suppose that the same distance is measured horizontally and vertically and that the horizontal length is 300 microns and the vertical length is 295,833 microns.
The scale factor will be 300/295,833 = 1,01408
Since it is greater than 1, the new value
for BOTTOM = 576 / 1,01408, that is, BOTTOM
= 568.
In this case the RIGHT value need
not be modified.
Confirm by pressing Apply and restart
the program.
The live image window can be resized to adapt
it to the work environment in view of the resolution chosen for the VGA
card.
![]() The size modification can require a new calibration of the
system's optics.
The size modification can require a new calibration of the
system's optics.