Open this dialog by selecting Vickers Test Parameters from the Vickers menu.
![]() All data necessary for the generation
of a printable report can be inserted in this window.
All data necessary for the generation
of a printable report can be inserted in this window.
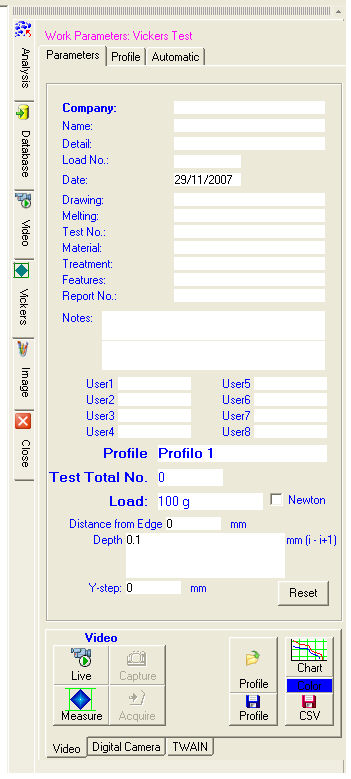 Parameters
The field names can be customized by modifying the Language2.txt file (C:\Programs\Alexasoft_X-Pro).
Profile
Name of the current profile.
Test Total
No.
Number of acquired measurement tests.
Load
The value of the load is the current one. If you wish to send to the report
the value in Newton instead of Kg. select the Newton check box.
Distance
from Edge (surface)
Insert the distance of the first impression from the edge.
Depth
Insert only one value in mm if the step between an impression and another
is constant. Otherwise insert the various steps separated by the hyphen
- as shown in the figure.
Y-Step
Insert the value of the displacement perpendicular to the direction of
the profile (zigzag) if different from zero.
Delete
Deletes the fields of the file relative to the client's data.
The image of the impression can be acquired by three types of devices: Video (WDM), Digital Cameras and TWAIN by pressing the appropriate tab.
The ![]() switch enables/disables the live image.
switch enables/disables the live image.
![]() With WDM devices it is possible to perform the manual measurement
for microhardness also on the live image.
With WDM devices it is possible to perform the manual measurement
for microhardness also on the live image.
The ![]() button enables/disables the manual/automatic measurement
mode.
button enables/disables the manual/automatic measurement
mode.
The ![]() button captures the image. In manual mode the measuring
graticule is automatically activated.
button captures the image. In manual mode the measuring
graticule is automatically activated.
With the ![]() button the test measurements are sent to the active
profile table. If Excel has been activated the measurements are sent to
the current spreadsheet.
button the test measurements are sent to the active
profile table. If Excel has been activated the measurements are sent to
the current spreadsheet.
The  buttons allow the storing and the showing of all
the profile data (file with .hvk extension).
buttons allow the storing and the showing of all
the profile data (file with .hvk extension).
The  button sends the table data of the selected profiles
to the chart. The trace color in the chart can be customized.
button sends the table data of the selected profiles
to the chart. The trace color in the chart can be customized.
The ![]() button saves the profile data in CSV format.
button saves the profile data in CSV format.