Allows you to zoom the image.
Click the left mouse button on the region of interest of the image. The chosen point, when the zoom factor is increased, will be taken towards the center of the active window. If necessary, the cursors for horizontal and vertical scrolling of the zoomed image will be shown. As the zoom factor changes, the graphic part of the image (measurements, etc.) is resized to scale.
The zoom is applied relatively to the current image center: if necessary, the cursors for horizontal and vertical scrolling of the image will be shown. The vectorial part of the image is resized to scale.
Restores the view of the image to the standard zoom factor of 1x.
When the images have a zoom factor equal to one they are displayed in their
standard view.
If active this switch allows you to view the whole image by calculating
automatically the required zoom factor.
If disabled the image is displayed with zoom factor equal to one.
Restores the original images at the time of loading.
Deletes every graphic element displayed on the image.
Keeps the images open even during the loading of the live image.
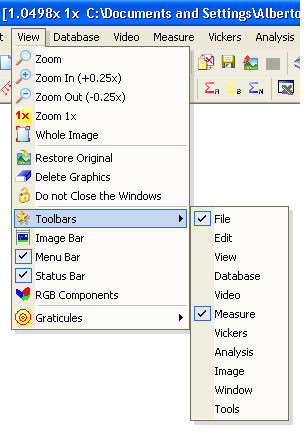
Each main menu option has its own toolbar.
To view the desired bars select View->Toolbars->.
The bars can be moved by dragging them with the mouse both to the borders
of the work area and inside the work area. The bars will always be in
the image foreground.
![]() File
menu toolbar
File
menu toolbar
![]() Measure menu toolbar
Measure menu toolbar
You can customize each bar: click the left mouse button on the black downward arrow at the right end of the icons.
The Reset Toolbar option restarts the work environment.
Each icon has its own ToolTip
describing the related function. Example:![]()
![]()
Displays graphically the thumbnails of the images which are presently
open in the work environment. The bar is freely positionable.
If the left mouse button is clicked on a thumbnail in the bar, the corresponding
original image will be placed in the foreground at the chosen scale factor.

Allows you to view the main menu.
If the main menu is disabled, the View toolbar will be automatically activated in order to restore the menu.
The status bar is the bar situated on the lower border of the work environment. The status bar displays useful information such as the current image format, the current objective, the Vickers loads, the mouse coordinates on the image and the RGB components if active through View menu->RGB Components.
![]()
This switch allows you to view on the Status Bar the three color components of the pixel indicated by the mouse pointer.
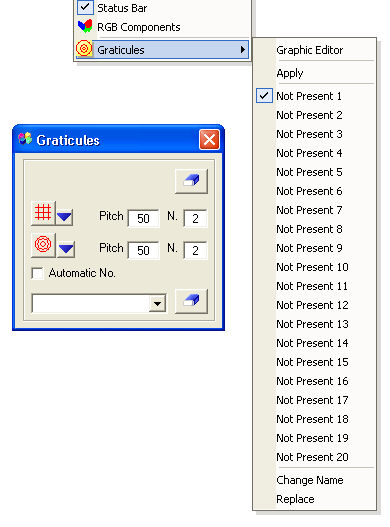
DYNAMIC GRATICULES
Graphic Editor
Allows you to create squared grid
or circular crowns graticules
specifying the pitch and the number of squares or crowns.
If the image is calibrated, by pressing the ![]() or
or
![]() button, the graticule will be applied onto the image.
button, the graticule will be applied onto the image.
If the Automatic Number
check box is selected, the whole image will be overlaid with the chosen
type of graticule.
The ![]() buttons
insert the graticules created in the Preferences
pull-down list.
buttons
insert the graticules created in the Preferences
pull-down list.
STATIC GRATICULES
If you have graticule images for calibration or for classifying the type
of "grain", etc., it is possible to make visual comparisons
with the active image. Applying the graticule entails the superimposition
of the current graticule on the active image.
![]() For a better final result, the graticule image should have
a black background.
For a better final result, the graticule image should have
a black background.
Inserting a graticule
Open the graticule image. Select the desired option in the graticule list.
Select Change Name and enter the
name of the graticule. Then select Replace.
Close the graticule image.
Applying a graticule
Open the image to be compared. Select from the Graticules menu the Apply option.
The current graticule will be superimposed on the active image.